How to create an Internet of things of the "building blocks" LEGO platform AWS IoT
In one of the projects we have tested the potential of the cloud platform AWS IoT by connecting it to multiple devices from a set of Lego programmable robots for Mindstorms EV3.
/ >
At the start we researched several major cloud services for IoT, which gave impetus to the whole concept of the Internet of things (IoT) — Microsoft Azure IoT services, AWS, IoT and IoT IBM Watson — but in the end chose Amazon Web Services (AWS).
General structural scheme was such:

At this stage the project looks not too complicated, that allows to consider the IoT as a whole, without too much detail.
With AWS, create an account with Amazon Web Service directly it choose and configure the desired services.
For a start it took us EC2 virtual server with Linux on Board.
We created a new instance of a class (instance) chose the image of the Ubuntu Server from the list of Amazon Linux, Red Hat, SUSE and Windows Server 2012 c SQL Server Express and without. Now you can set the instance: CPU, memory, storage, network capabilities, configuration, tagging and security. At the end of the generated key pair to access the service (you can use the existing pair).
→ a More detailed guide from AWS
To access the server we used the free client PuTTY.
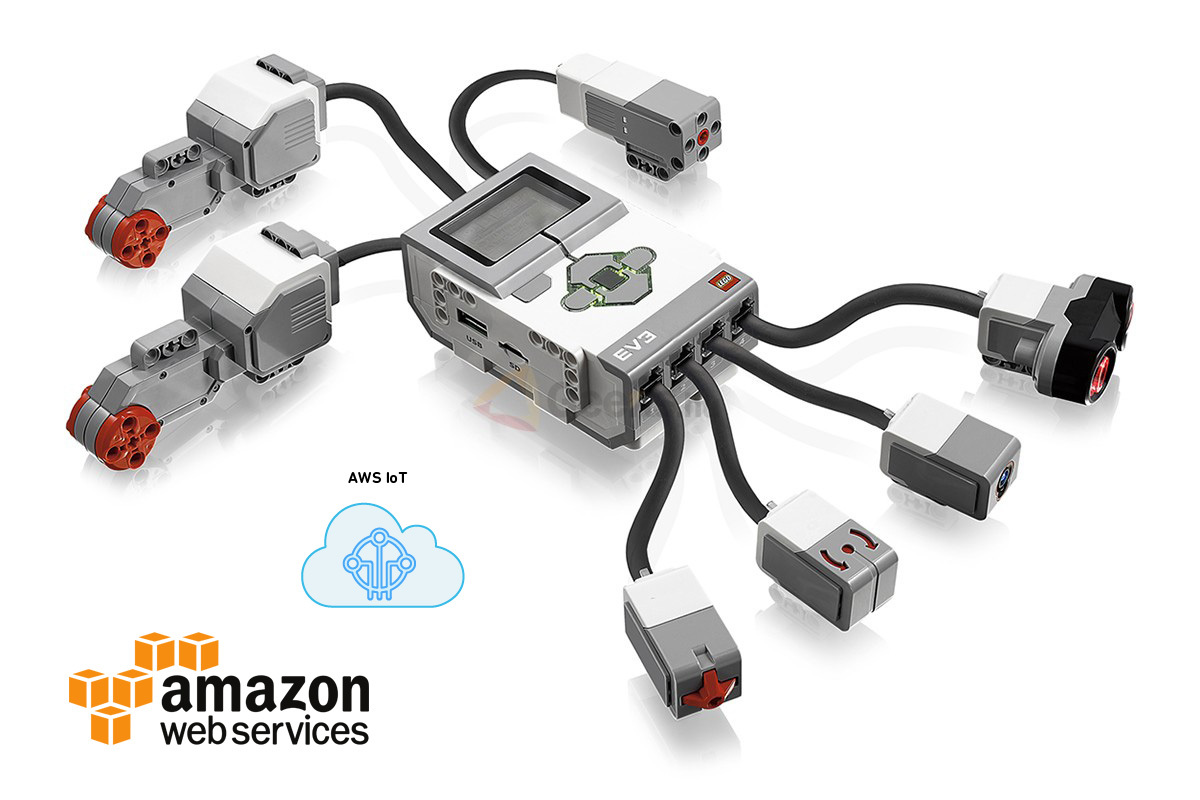
In our project things — devices connected to the AWS IoT become "bricks" Lego Mindstorms EV3.
Specifications:
the
-
the
- Processor — ARM9 (designer NXT 2.0 were used ARM7) the
- FLASH memory 16 MB the
- RAM — 64 MB the
- Operating system — Linux the
- SD expansion Slot the
- USB 2.0 (supports USB Host, it is possible to insert a WiFi-whistle) the
- Bluetooth 2.1 the
- 4 port input and 4 — output the
- Speakerphone
You can combine up to four of these modules.

In addition to the main brick we also have:

the
-
the
- Three servos (two large and one small) the
- Sensor pressing the (simply — button) the
- Color sensor the
- distance Sensor (infrared)
For starters, every IoT device you must register in AWS IoT. There we receive the certificates and keys to connect the device, register a unique name / identifier of our things.

Then we wrote an app for "bricks" in C#. Used to do this:
the
-
the
- library LEGO MINDSTORMS EV3 API for .NET for communicating with "the brick"; the
- JSON framework for .NET from Newtonsoft to generate messages to the server on Node.js in JSON-format; the
- uPLibrary.Networking.M2Mqtt MQTT Protocol for communication of things IoT with AWS (AWS IoT also supports protocols HTTP 1.1 and WebSocket); the
- of the standard library .NET System.
On the server, we deployed a web server application on Node.js using the restify module and special modules from the AWS for the IoT and for applications that use their services: aws-iot-device-sdk and aws-sdk.
To store configuration information for each item used a NoSQL database Amazon Dynamo DB. It is created in AWS account – one base for a single account. There are created all necessary tables and attributes are configured.
As stated on the official website of AWS, AWS supports IoT messaging model publish-and-subscribe, i.e. our site or thing can create the required number of topics for subscriptions, and all other services or devices must subscribe to them to work with this thing. In practice it looks so: when registering, a main topic of things, the name of which corresponds to its ID when registering, and then topics created within this main topic when it is first published in this message (<identifier things>/<some topic>). Therefore, it is important to first subscribe to all your topics in the beginning of the application and the device.
Each of our device were the following topics:
the
- Topics to receive commands for the output ports in which a server publishes the command values for the motors. the
- Topics for ports of entry to send the values from the sensors to the server.
on the Topic of configuration items to send to our server the information about things: which ports are connected, aliases stuff and ports etc. the

When you enable apps, a device publishes information about itself in the topic configuration, which reads the server and stores in the database. Next, using the web interface you can configure the connection of any sensor from any connected device to any motor any connected device, choose mathematical logic sensor which will process the value from it, to send a specific value to the motor, or to receive data from the sensors.

In the end we got a web terminal for controlling and monitoring controllers with a custom ability to control the outputs (motors) one terminal with inputs (sensors) of the other.
Cloud platforms like AWS IoT integrate any sensors with the necessary interfaces collect data in the cloud, help analyze information and manage their Internet of things through mobile apps. All the technology is there, just need the imagination to implement these features in specific devices — sensors for smart home and office, entertainment, transportation, production automation, even for huge fighting humanoid robots.


Комментарии
Отправить комментарий